

Since ancient times, wallpaper has been used to decorate walls in homes with eye-catching patterns and designs. With so many different hues, patterns, and textures to choose from, it’s a popular option for homeowners who want to give their houses a distinctive look. Fortunately, hanging wallpaper may be done yourself. However, to avoid noticeable seams, misaligned wallpaper strips, tears, peeling edges, or bubbles, take your time and make sure it’s put exactly. To learn how to hang wallpaper, refer to this guide.
Safety Measures
Although hanging wallpaper is a reasonably safe operation, it’s still a good idea to use safety goggles or glasses to avoid getting wallpaper pasted in your eyes. To further protect the floor and any furniture, place down a drop cloth. Since you will be using a sharp blade around electrical outlets and sockets when trimming the wallpaper, cover these areas with painter’s tape and turn off the electricity to the wall outlets.
How Much Is Needed for Wallpaper?
How to hang wallpaper: The size, arrangement, and wallpaper design of the room will determine how to hang wallpaper and how much wallpaper is required for the project. Measure each wall’s height and width first. To determine the surface area of each wall, multiply the width by the height. Then, add the findings to determine the total square footage that the wallpaper must cover.
Wall Setting Up
One of the most crucial aspects of any endeavour is getting the walls ready. Wallpaper will not stick effectively on filthy, uneven, or damaged walls. Carefully inspect the walls and fill in any gaps or bumps. Next, use a moist cloth to wipe the walls clean of any dirt, dust, oil, or other debris.
To shield the outlets and electrical sockets from wallpaper paste:
- Remove all outlet and light switch faceplates with a screwdriver and cover them with painter’s tape.
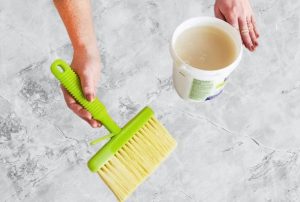
- With a paintbrush or paint roller, apply wallpaper priming to the walls to make sure the wallpaper sticks to the walls without any issues.
- Let the wallpaper primer dry completely before continuing.
Guidelines
How to hang wallpaper
Step 1: Mark the plum Line in

A plumb line is an absolutely straight line that serves as a guide to guarantee that the wallpaper strips are placed correctly. Draw a straight vertical plumb line down the wall from the top to the baseboard using a 6-foot level and a straight edge. Starting with this line, the first wallpaper panel is created. To make sure you hang wallpaper properly every time, it’s a good idea to add more plumb lines along the walls.
Step 2: Plan the wallpaper layout
Although the plumb line aids in maintaining the wallpaper’s straightness, you should still design the arrangement before beginning to hang the wallpaper. Place a roll of wallpaper in the corner and mark the area the roll will cover on the wall using the other end of the roll.
Make another pencil mark on the wall at the opposite end of the roll after sliding it over until the first mark is approximately an inch from the end. The 1-inch overlap takes care of the overlap that’s required for wallpaper application. To design a general pattern for the room, repeat this method, but remember that certain wallpaper panels might need to be clipped so that little strips don’t hang wallpaper near windows, doorways, or corners.
Step 3: Use Paste for Wallpaper
Applying wallpaper paste comes next once the wallpaper has been laid out and the strips have been cut to the proper sizes. The precise kind of wallpaper paste required for this task varies depending on the particular brand of wallpaper; see the manufacturer’s instructions to find out.
Set up a large work area, such as a table or workbench, so that the wallpaper panels may be extended out on it. After laying down the first panel, use a paint roller to apply the wallpaper paste. To ensure that the two edges meet in the middle, fold the wallpaper over into itself. Booking is the procedure that makes sure the wallpaper thoroughly absorbs the paste.
Step 4: Put the Wall covering up
The wallpaper panel is ready to hang after soaking for approximately three minutes. The wallpaper should first be aligned with the plumb line. Work your way down the wall, starting at the top. After the wallpaper is in place, gently smooth it out and remove any extra wallpaper paste with a wallpaper smoothing tool. Avoid tugging or stretching the wallpaper, as this may cause rips.
When the next wallpaper strip is prepared, align the edges so that they overlap by approximately one inch. Commence at the wall’s top.
Step 5: Even Bubbles
Smooth the wallpaper to get rid of any bubbles and extra paste once it is installed. Until all of the wallpaper pieces are hung, keep hanging wallpaper panels and flattening bubbles.
Step 6: Neaten the Corners
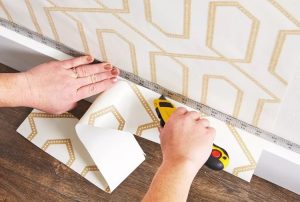
Hold the wallpaper in place at the top of the wall using a level or straight edge, and then trim it by cutting along the straight edge. Continue doing this around the door trim, window trim, and baseboards.
Step 7: Cut the area surrounding the outlets.
Cut off any excess material around light switches, outlets, and fixtures. Turn off the power at the electrical panel before clipping the wallpaper around outlets or wiring to prevent unintentional electrocution. Using a pencil, lightly indicate the area that has to be trimmed, and then cut around it using a utility knife.
Step 8: Remove the wall covering
To get rid of extra wallpaper, paste:
- Wipe each wallpaper panel with a moist sponge or towel.
- Only lightly moisten the sponge or cloth—too much moisture can cause damage to the wallpaper.
- Wipe the wallpaper down once more to get rid of any leftover residue once it has had time to dry and cure.
Troubleshooting Advice for How to Hang Wallpaper
It can be difficult to learn how to hang wallpaper. Therefore, it’s critical to know what to do in case of difficulties.
Patch minor rips or bubbles in the wallpaper by using a utility knife to cut a partial circle around the affected area, putting wallpaper paste on the back of the cut flap, pressing the flap back into place, and then using a wallpaper smoothing tool to smooth it out.
Realign the wallpaper properly by carefully lifting the edges to correct any misaligned seams or patterns. For optimal results, push the edges into place with a seam roller or smoothing tool.
Make a tiny incision with a utility knife to release any big air bubbles that are hidden beneath the wallpaper. This lets the air out while you smooth the area using a wallpaper smoothing tool.
Before the wallpaper paste dries, wipe away any extras with a moist sponge or cloth. After applying, make sure to wipe down each item with a sponge or towel.